Wednesday, August 31, 2011

Tuna Tarragon Pasta Salad

If you have ever gone to Sweet Tomatoes or Souplantation, you know they have this wonderful pasta salad on the salad bar. Since we live about as far as you can get to a Sweet Tomatoes restaurant, I only get to eat this when my sister insists that we visit ST when we are in town visiting our mum in Arizona. Since I don't get to visit monthly I had to search for a copycat recipe to make at home. This is what I found and I think it is spot on! It is fantastic, and great chilled in the summer months for a picnic or BBQ. Make a batch today and find out yourself just what you are missing if you have never eaten at Sweet Tomatoes.

*I only made half the recipe, it is easy to half!

From Food.com

  • tablespoon salt
  • cups small shell pasta
  • 1 1/4 cups penne pasta
  • cup spinach fettuccine (3-inch pieces)
  • tablespoons canola oil
  • 2 (6 ounce) cans tuna in water
  • cups sweet pickle juice (small jar contains about 1 cup)
  • 1 3/4 cups mayonnaise
  • 1 1/2 cups sweet pickles (diced)
  • cup celery (diced)
  • 1/2 cup sour cream
  • 1 1/2 tablespoons dried tarragon leaves
  • teaspoon salt
  • 1/2 teaspoon white pepper
  • For the pasta: In a large pot, bring 3 quarts of water and 1 tablespoon salt to a full boil. Add pastas and cook for about 10 minutes until al dente. Immediately strain pasta and cool by running cold water over pasta in strainer. Drain pasta completely and place in a bowl. Coat pasta with canola oil to prevent sticking.

  • For the dressing: Place tuna in a large bowl and break down into small pieces. Add the remaining dressing ingredients and thoroughly whisk to combine.

  • Combine the dressing and cooked pasta and mix thoroughly. ALLOW SALAD TO MARINATE FOR 8 HOURS! After 8 hours, top with more pickle juice and salt and pepper to taste.


Chicken Sausage and Shrimp

After being on a mini vacation, I come home to find my fridge and pantry needing a little clean out. So when I have a mixed bag of food to use up for dinner I either make a pot of soup or a bowl of mixed goodies. What i came up with last night was very  tasty and something I will be sure to make again very soon!!! A big bowl of love, enjoy!

2-3 TBS. EVOO
2 carrots chopped small
2 ribs celery chopped small
3 shallots sliced
6 mushrooms chopped
1 lb uncooked shrimp
1 pkg El Fresco Chicken Chipotle sausage, browned
salt and pepper
1/2 cup of stock (veggie or chicken)
1 can tomato sauce (15oz)
dried tarragon to taste
dried oregano to taste
garlic powder and onion powder

Heat a large pan over med heat and add EVOO. Add veggies and cook until tender. Add browned chicken, stock, and tomato sauce and heat. Then add shrimp to cook, once shrimp is cooked at spices! I served this over a mound of smashed potatoes, with a side of fried parm zucchini!

Monday, August 22, 2011

Cookies for Q!

The other night as I was tucking my son into bed, he asked "can we bake cookies tomorrow"? Thought it was adorable, so sure enough after breakfast we got to baking. I told him that he could make any kind of cookie he wanted. So he picked chocolate chip, since of course I was out of chocolate chips. So we had some hershey bars in the pantry so we just broke those up and added them to some oatmeal cookies. He was so happy to bake his cookies and his dino, Boris wanted in on the cookie eating fun too!

Q's Choco Chunk Cookies

*1/2 cup ( 1 stick) butter
*3/4 cup firmly packed dark brown sugar
* 1/2 cup granulated sugar
*2 eggs
*1 teaspoon vanilla
*1 1/2 cups all-purpose unbleached flour
*1 teaspoon baking soda
*1 teaspoon ground cinnamon
*1 1/2 cups oats
* 1/2 chopped macadamia nuts
* 3 hershey chocolate bars broken

Heat oven to 350*
In large bowl, beat butter and sugars on medium speed until creamy
Add eggs and vanilla, beat well
Add combined flour, baking soda, cinnamon and mix well
Add oats and chocolate and mix well
Bake 8-10 mins on a cookie sheet

Friday, August 19, 2011

Groovy Green Tea Cheesecake

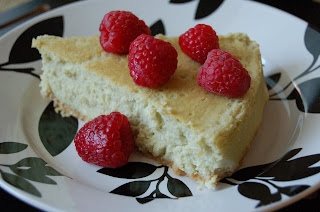
My 9th wedding anniversary to my awesome husband is tomorrow. Since he has kept me in the dark about any plans for the day I wanted to make a little something sweet for us to enjoy this weekend. In doing so I think I have started a new tradition. Anniversary cheesecake=) I love to make and eat cheesecake and when I heard of a green tea cheesecake I was thrilled to try it. I think it taste like green tea ice cream in a way so if you like that you will like this. It turned out to be a light green shade, hard to tell from this photo. The key to it is the green tea powder. I had some in my pantry that I had ordered offline awhile back. You can also get it at asian food stores.
Adapted from Bon Appetit

  • 1 1/3 cup  ground shortbread cookies 

  • 3 8-ounce packages cream cheese, room temperature

  • 1 package mascarpone

  • 1 1/2 cups sugar

  • 4 large eggs

  • 2-3 teaspoons Japanese green tea powder** or 2-3 teaspoons finely ground green tea from about 4 tea bags

  • Preheat oven to 325°F. Press cookie crumbs firmly onto bottom (not sides) of 10-inch-diameter springform pan. Wrap outside of pan tightly with 3 layers of heavy-duty foil. Using electric mixer, beat cream cheese, mascarpone, and sugar in large bowl until smooth. Add eggs 1 at a time, beating until incorporated after each addition. Beat in green tea powder until smooth. Pour batter over prepared crust in pan. Place cake in roasting pan; add enough hot water to roasting pan to come halfway up sides of springform pan.
    Bake cake until set but center moves very slightly when pan is gently shaken, about 1 hour. Remove cake from roasting pan; cool 1 hour at room temperature. Refrigerate uncovered overnight. (Can be prepared 2 days ahead. Cover and keep refrigerated.)


  • Thursday, August 18, 2011

    Lamb Chili

    While we were living in North Dakota for 2 years, it was so hard to find lamb at the grocery store. They would only carry it around Christmas and Easter. While living there I found lots of recipes for ground lamb, I was just waiting to make. Now that we are out of that state (big smile) I was able to find ground lamb at the grocery store. The first time I spotted it I almost screamed out in happiness!!! I was so thrilled to stock up and try out all these ground lamb recipes! I have made 3 or 4 dishes so far, all great and will be posted on the blog in the near future!
    Since the weather has a nice brisk chill to the air I have been craving chili. So I pulled some lamb from my freezer stash and cooked up this beauty. With not much effort you can put this hearty chili on the table in no time. If you happen to be scared of lamb, you could always use beef, or if you are not a red meat eater, try ground chicken or turkey. Then serve yourself up a hot bowl and snuggle up in front of a good movie or the fireplace (if you are lucky enough to have one). Enjoy!

    Adapted from Bon Appetit
    *2 cups of broth chicken, beef of veggie or a combo( I used 1 cup of beef and 1 cup of chicken)
    *2-3oz. stem and seeds removed dried ancho peppers (3or 4 peppers)
    *1 TBS. cayenne pepper
    *1 lb of ground lamb
    *1lb or one pkg of beef chorizo, casing removed
    *1 small red onion,chopped
    *1 small green pepper, chopped
    *4-5 cloves of garlic, grated or chopped small
    *3 cans of beans, I used black beans, kidney beans, pinto beans
    *2 cups crushed tomatoes
    *1 can fired roasted tomatoes
    *1 TBS dried oregano
    *1 TBS cumin
    *Grated Sharp cheddar cheese (as sharp as you can get, I used Cabot Seriously Sharp)
    *Sour cream
    *Cilantro
    *Green onions
    *Combine first 3 ingredients in a small pan and simmer over med high heat until chilies are soft and both is dark. Puree in food processor
    *Cook chorizo in a skillet for 5 mins breaking up into small pieces. Then add onions, green pepper, garlic, cumin, and oregano. Cook down the veggies until soft about 5 mins. Then add in drained beans. In another pot brown lamb. While lamb is cooking, add both kinds of tomatoes to the chorizo mixture. Once lamb is browned add the ancho/broth puree and mix that with the rest of the chili. Let simmer for 15-20. If it is a little thick add a little extra broth. Add salt and pepper to taste and top with sour cream, cilantro, and green onions.

    Tuesday, August 16, 2011

    My love for Quinoa!

    I have not been cooking with Quinoa(pronounced KEEN-WA) all that long, and I feel like I have missed out since I have not been cooking with it for years! It is a wonderful thing to try out if you have not already! Bob's Red Mill(shown above) is my favorite brand. It is a little pricey, but some places do have sales on it and a bag will last you awhile. Other then it being very tasty and versatile, it is extremely healthy! You can swap it out for any other grain in a dish. I use it the most in cold grain salads, I have cooked it kind of risotto style, and even used cooked Quinoa mixed into banana bread!
    This cold salad is my go to Quinoa dish.
    *1 cup of dry Quinoa
    *2 cups of water, veggie stock or chicken stock
    *1 can low sodium kidney beans, drained
    *3-4 leaves fresh basil, chopped
    *juice of one lemon
    *2 TBS EVOO
    *black pepper to taste
    Prep Quinoa to pkg directions and let cool
    Mix cooled Quina with kidney beans, basil, lemon juice,EVOO, and pepper
    Chill in the fridge, it is better the second day!

    Pumpkin Scone

    Last week I was thrilled to find pumpkin scones in my local Starbucks! I was thrilled for a few reasons. Fall is my favorite season and seeing a pumpkin baked good makes me feel like it is in fact FALL. Also I happen to love all things pumpkin and enjoy the pumpkin scones at Starbucks. I have never tried to bake scones at home. In fact I don't even like the word scone because it makes me think of a very dry baked good. I have never liked scones until I had the pumpkin one at Starbucks and the only reason I broke down a spent money on a thing called a scone was because it had the word pumpkin in front of it. I would probably try just about anything if it contained pumpkin! So I decided to search the internet for the copycat scone recipe. Several had the same copycat recipe from Starbucks, and all the reviews said it was the same as what you would buy at the coffee shop. I have to disagree. I think this is  delish and worth making( it is simple) but I think it is just a little off from the original. They are a wonderful fall treat with that pumpkin flavor I love so much. Make a bunch and let me know what you think.


    Starbucks® Pumpkin Scones

    2 Cups all-purpose flour
    7 Tablespoons granulated sugar
    1 Tablespoon baking powder
    1/2 Teaspoon salt
    1/2 Teaspoon ground cinnamon
    1/2 Teaspoon ground nutmeg
    1/4 Teaspoon ground cloves
    1/4 Teaspoon ground ginger
    1/2 Cup canned pumpkin
    3 Tablespoons half and half
    1 Large egg
    6 Tablespoons cold butter

    PLAIN GLAZE
    1 Cup plus 1 tablespoon powdered sugar
    2 Tablespoons whole milk

    SPICED ICING
    1 Cup plus 3 Tablspoons powdered sugar
    2 Tablespoons whole milk
    1/4 Teaspoon ground cinnamon
    1/8 Teaspoon ground nutmeg
    1 Pinch ground ginger
    1 Pinch ground cloves

    Preheat oven to 425°F.
    .
    Scones:
    Combine flour, sugar, baking powder, salt, 1/2 teaspoon cinnamon, 1/2 teaspoon nutmeg, 1/4 teaspoon cloves, and 1/4 teaspoon ginger in a large bowl.
    In a separate bowl, whisk together pumpkin, half and half and egg.
    Cut butter into cubes then add it to the dry ingredients. Use a pastry knife or a fork to combine butter with dry ingredients. Continue mixing until no chunks of butter are visible. You can also use a food processor: Pulse butter into dry ingredients until it is the texture of cornmeal or coarse sand.
    Fold wet ingredients into dry ingredients, then form the dough into a ball. Pat out dough onto a lightly floured surface and form it into a 1-inch thick rectangle that is about 9 inches long and 3 inches wide. Use a large knife or a pizza wheel to slice the dough twice through the width, making three equal portions. cut those three slices diagonally so that you have 6 triangular slices of dough.
    Bake for 14 to 16 minutes on a baking sheet that has been lightly oiled or lined with parchment paper. Scones should begin to turn light brown.

    Plain Glaze:
    Combine ingredients in a medium bowl. Using an electric mixer on medium speed mix until smooth.
    Brush a coating of the glaze over the top of each cooled scone.
    Allow plain glaze to set up.

    Spiced Icing:
    Combine ingredients in a cleam bowl. Using an electric mixer on medium speed. mix until smooth. Drizzle this thicker icing over each scone and allow the icing to dry before serving (at least 1 hour).

    Makes 6 scones

    Sunday, August 14, 2011

    Heavenly Hawaiian French Toast

    During football season I make a BIG breakfast every Sunday. Depending on the game schedule, we have it for breakfast, lunch or dinner. The important part is that sunday football to us, is really not right unless we are having breakfast at some point during the day. So with it being preseason, what better way to start the first sunday of games.
    We happen to LOVE sweet hawaiian rolls! The original ones are fantastic for sliders! Then they starting making the sandwich size, that made me ecstatic!! So now I have also started buying the sliced sandwich bread loaf of the sweet hawaiian bread. So with us craving breakfast on this brisk fall day with football on the tv. I decided to whip up some special super easy french toast, with HAWAIIAN BREAD!

    *About 5 slices of Hawaiian sandwich bread
    *2 eggs
    *about 1/4 cup of whole milk
    *splash of heavy cream ( only add if you would like)
    *dash of cinnamon
    *dash of nutmeg
    *1/2 teaspoon of vanilla
    *equal parts good quality REAL maple syrup and butter
    *butter for pan.

    Heat  a pan over med heat. Melt butter in the pan to cover the pan. While the pan is heating up, lightly whisk eggs and milk with a fork to combine. Add cream, cinnamon, nutmeg, and vanilla to milk and egg mixture. Whisk to combine everything together. Dip both sides of bread into the egg mixture, and cook in hot pan until golden brown then flip to cook other side. Repeat with remaining bread. Heat in a microwave bowl equal parts maple syrup and butter. Stir this heavenly gold over your hot golden french toast and enjoy!!!!!!!!!!!

    Friday, August 12, 2011

    "Watermelon LOOking" jello.....or jello shots

    Is that like the cutest thing you have ever seen? It looks like a tiny piece of watermelon! So what is it, really? The flesh of a lime filled with Jello. In this case it is Strawberry Jello, but if you can find watermelon, go for that or even cherry or raspberry. Have a blast with it!!! I ran out of limes so I started to use lemon. So that is more like a strawberry lemon, yummy right? So how cute would these be for a kids birthday (without alcohol of course)! Or I am thinking like a summer BBQ or any party for that matter.
    MAKE A BUNCH!!!!!!!!!!!
    From the amazing mind of "That's so Michelle" check out her website.

    1. Prepare limes by cutting them in halves and hollowing out the peel. This is a little tricky, you have to kind of use your thumb to help you out, once you get a method going then it is pretty fast. The trick is to take a paring knife and score around the insides carefully to loosen the citrus. Then spoon it out saving the fruit. (If you have a juicer for every 1 cup of lime juice add 6 cups of water and half a cup of sugar and 3 teaspoons of honey for an awesome limeade).


    2. Make Jello how you want with water or adult things of many kinds. Pour careful in the half of the lime sitting up and have them on a tray and pop in the fridge. Once they are set, cut them in half so each lime with make 4 pieces.

    Raspberry Lemonade Bars

    Well we finally have a beautiful sunny warm day up here! As much a I don't want to admit it, this could be one of our last days like this, fall is peaking at us quite often this time of year. So to celebrate the last few "run in the grass barefoot" kind of days. I want something on the light summer refreshing side of things. In my findings I found an awesome site sophistimom.com ! She had these beautiful looking bars there and knew I had to give them a try. They are just what i was looking for, with a tart kick. Happy Friday everyone go out and enjoy the weather!


    FROM sophistimom.com
    for the crust:
    9 tablespoons unsalted butter
    1/4  granulated sugar
    1 cup  flour
    pinch salt
    for the filling:
    1 1/2 cups  granulated sugar
    3 egg whites
    1 egg
    2/3 cup freshly squeezed lemon juice (from 3 lemons)
    2 tablespoons lemon zest (from 2 lemons)
    2/3 cup flour
    pinch of salt
    1 bag of frozen raspberries, defrosted
    1 tablespoon confectioner’s sugar

    1. Preheat oven to 350 degrees . Line a 8×8″  square baking pan with a strip of parchment paper  that covers the bottom and overlaps on either side.

    2. Cream butter, sugar, and salt with an electric mixer. Mix in flour until just incorporated. Flour hands and press dough into 8×8″ square baking pan, so that it comes up about a 1/2 inch around the sides.


    3. Bake for 20-25 minutes, or until slightly golden brown. While it cools, prepare the filling.

    4. Whisk sugar, egg whites, egg, lemon juice and zest, flour, and salt in a large bowl. Pour raspberries into a sieve and press through to extract all the pulp and juices. Whisk into lemon mixture and pour into crust. Bake for 35-40 minutes until filling is completely set. Let cool completely. (I help mine along in the freezer for about an hour.) Using the overlapping edges of parchment paper, gently lift the dessert from the pan. Cut into 16 squares. Dust with confectioner’s sugar.


    Wednesday, August 10, 2011

    Oreo Truffles..oh how I LOVE thee!

    OH how I love these! I could write pages about how wonderful these little babies are. How amazingly easy they are to make,but they look fancy. Oreo Truffles may just have the power to save the world, or at least make many grown adults giddy as children even for just a moment. You can get a major WOW factor with very minimal effort. These are perfect to make for entertaining, gifts of all kind. I especially like making them around the holidays. My favorite way to package them and present them is as followed.
    *Place an assortment of white chocolate and milk chocolate oreo truffles in mini muffin paper wraps (customize them to the season or holiday).
    *Pack them in a bakers box, a festive tin, decorative basket...ect.
    *Loosely wrap with beautiful tissue paper.
    Great for teachers, friends, neighbors, family, hair dresser, the mailman.....ect
    Another wonderful thing is you can double the recipe or more and do a big batch and knock it out really fast. Not to be a cheap girl but, these do not cost an arm and a leg, like you my have spent to buy something already made like this for gifts. I hope these also bring many positive vibes your way along with happy tummy's. HUGS!

    From Kraft Foods, p.s. I will be forever grateful to Kraft Foods for these little gems!


    what you need

    1 pkg. (8 oz.) PHILADELPHIA Cream Cheese, softened
    1 pkg.  (16.6 oz.) OREO Cookies, finely crushed (about 4-1/4 cups), divided
    2 pkg. (8 squares each) BAKER'S Semi-Sweet Chocolate, melted

    make it

    MIX cream cheese and 3 cups cookie crumbs until well blended.
    SHAPE into 48 (1-inch) balls. Dip in melted chocolate; place on waxed paper-covered baking sheet. Sprinkle with remaining cookie crumbs.
    REFRIGERATE 1 hour or until firm. Store in tightly covered container in refrigerator.

    kraft kitchens tips

    HOW TO MELT CHOCOLATE
    Place unwrapped chocolate squares in microwaveable bowl. Microwave on HIGH 2-1/2 min. or until chocolate is completely melted, stirring every 30 sec.
    HOW TO EASILY DIP TRUFFLES
    To easily coat truffles with the melted chocolate, add truffles, in batches, to bowl of melted chocolate. Use 2 forks to roll truffles in chocolate until evenly coated. Remove truffles with forks, letting excess chocolate drip back into bowl. Place truffles on prepared baking sheet; let stand until firm.
    HOW TO STORE
    Store in tightly covered container in refrigerator.

    Tuesday, August 9, 2011

    Chile-Corn Custard Squares


    • This turned out to be a fun, quick and easy side dish, app, or just a snack. The brown crunchy cheese top was the best!  Nice and corny=) Big bonus is you could make a bunch ahead of time for a party and serve at room temp.
    • From Bon Appetit
    • 3 1/2 tablespoons vegetable oil, divided
    • 1 large onion, finely chopped
    • Nonstick vegetable oil spray
    • 1/4 cup all purpose flour
    • 1/4 cup cornmeal
    • 1/2 teaspoon baking powder
    • 1/4 teaspoon salt
    • 1 large egg
    • 2/3 cup shredded Mexican cheese blend or 1/3 cup sharp cheddar cheese mixed with 1/3 cup crumbled queso fresco, divided
    • 1/2 cup sour cream plus additional for garnish
    • 1/2 cup canned creamed corn
    • 2 tablespoons minced seeded jalapeño chiles
    • Tomato salsa (for garnish)

    Preparation

    • Heat 1 1/2 tablespoons vegetable oil in heavy large skillet over medium-high heat. Add finely chopped onion and sauté until soft and beginning to brown, stirring often, about 12 minutes. Cool.
    • Preheat oven to 350°F. Spray 8x8x2-inch metal baking pan with nonstick spray. Whisk flour, cornmeal, baking powder, and salt in small bowl. Whisk egg, 1/3 cup cheese blend, 1/2 cup sour cream, creamed corn, and remaining 2 tablespoons oil in large bowl. Add flour mixture; stir to blend. Stir in jalapeño and caramelized onions. Transfer batter to prepared pan. Sprinkle remaining 1/3 cup cheese blend over.
    • Bake until puffed and tester inserted into center comes out clean, about 35 minutes. Cool completely. DO AHEAD Custard squares can be made 2 hours ahead. Let stand at room temperature.
    • Cut into squares. Place on platter. Top each square with dollop of sour cream, then small spoonful of salsa and cilantro.


    Monday, August 8, 2011

    Beet Risotto

    Beet Risotto

    My son and I are beet freaks! I have always loved them, and once I let my son taste them when he was 2 he was also hooked! He could eat a whole can of them in one sitting if I let him. So with the farmers market booming we have been picking up fresh beets and roasting them. After having our fill of beet salad I decided to try something a little different. Risotto is already a favorite in our house, but why not add some beets.  As you stir in the puree of beets the color is so vibrant, the dish almost looks like some type of candy!  This turned out great, with just a mild beet flavor. Trust me even people who are not beet lovers will gobble this up (the hubby did). Give this dish a try, the color alone will put a smile on your face. Happy eating!
    From Rachael Ray


    • 4 medium beets, scrubbed, stems and root ends trimmed and greens chopped and reserved for garnish
    • 2 tablespoons extra-virgin olive oil (EVOO), plus additional for drizzling
    • Salt and freshly ground black pepper
    • 2 cups water
    • 1 quart chicken or vegetable stock (use vegetable to make it vegetarian)
    • 1 tablespoon butter
    • 1 medium onion, finely chopped
    • 2 cloves garlic, finely chopped or grated
    • 2 cups arborio rice
    • 1/2 cup dry white wine or dry sherry
    • 1/2 cup (2 or 3 handfuls) grated Parmigiano-Reggiano, plus additional
    Yields: 4 servings

    Preparation

    Preheat oven to 375ºF.
    Place the beets on a large piece of aluminum foil and drizzle with some EVOO. Season with salt and freshly ground black pepper and fold the foil into a pouch. Roast the beets inside the pouch until tender, about 45 minutes.
    When the beets are done roasting, remove them from the pouch and let cool for a few minutes. When they're cool enough to handle, lightly rub the outside of them with a paper towel to remove the skins. Transfer the beets to a food processor and puree them until smooth. Reserve the puree until the risotto is finished cooking.
    Bring the water and stock to a boil in a saucepot, then reduce heat to low to keep warm.
    Place a large skillet over medium-high heat with 2 tablespoons EVOO, 2 turns of the pan, and butter. Add the onions and garlic, and sauté until the onions begin to get tender, 4-5 minutes. Add the arborio rice and toast it in the pan, stirring constantly with the veggies, 2-3 minutes more. Add wine or sherry and cook until the liquid has absorbed, 1 minute.
    Ladle about a third of the stock or broth into the pan with the rice and bring it up to a bubble, stirring constantly. Simmer the mixture, stirring frequently, until all the liquid is absorbed, about 5 minutes. Ladle another third of the remaining liquid and continue stirring the rice until that liquid has fully absorbed, 4-5 minutes. Ladle in half of the remaining stock and stir the rice another 4-5 minutes. Add in the beet puree and the rest of the stock and cook an additional 4-5 minutes, until the rice is al dente. Season with salt and freshly ground black pepper and stir in the Parmigiano-Reggiano.